
FFAN’s web user interface is a practical way to control the device and manage most common parameters and features. NB! WebUI does not have all the features and commands implemented. For precise and complete control use FFAN Configuration tool! To access the webUI use your device’s IP address (TIP! Press menu button on device until network tab is displayed on integrated display, there you find your device IP address) in your favorite web browser.
webUI walkthrough
Login screen
By default, webUI starts in unprotected admin mode which allows complete access to your device to anyone with access to that IP.
If you want to restrict other users to only control through the webUI, go to “Main menu -> Configurations -> Configure web server -> Password“
Doing so will set up a password that needs to be entered when trying to access webUI. This is a very thin layer of protection since everything is transmitted over unencrypted HTTP protocol.
Main menu
Main menu will be welcoming users after login. Here you can find all the available sub-menus and initiate device restart.
- Information
- Configurations
- Telemetry
- Outputs
- Inputs
- Statistics
- Console
- Logout (visible only if webUI password is set)
- Restart (will reboot device, after confirmation)
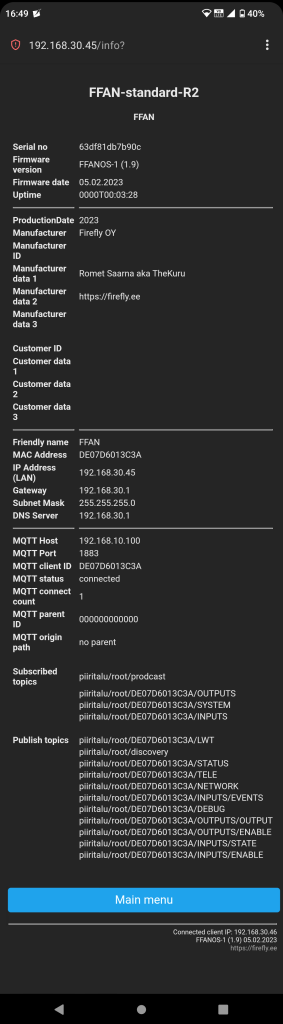
Main menu -> Information
Information page will provide all the necessary information about device. For example:
- Serial number
- Firmware info
- Manufacturer info
- Ethernet info (IP, MAC gateway, etc)
- MQTT server info (IP, port, topics, connection count, parent id, master/slave hierarchy)
Main menu -> Telemetry
Telemetry page will serve you connected sensors readings. Every FFAN Standard has one onboard temperature sensor that provides internal temperature readings. All other senors are optional. Sensors supported by FFAN Standard:
- up to three DS18B20 temperature sensors via external connector
- one DHT22/AM2302 temperature/hygrometer (has dedicated place on top pcb where it can be soldered in)
- one BME280 environmental (temperature, barometric pressure and humidity) sensor (has dedicated place on top pcb where it can be soldered in)
NB! Supports all those sensors at the same time. This means that all those sensor can be installed at once.
Main menu -> Outputs
Outputs page has controls that allow user to manipulate output ports individually or at once. Page will also provide visual state reference of every port.
TIP! Why is output toggle button disabled? Output port toggle button will be disabled if…
- output port is disabled
- output port does not have “allow external state change” flag set
- output port works in conjunction with one of the input ports (input port action “output follow input“)
Main menu -> Inputs
Inputs page will display current state of every input. Inputs colored red are disabled. Ports can be disabled/enabled under configuration menu.
- HIGH – No input signal detected
- LOW – Input signal present
Main menu -> Statistics
This page displays statistics of FFAN Standard device. I.e. boot count and runtime.
Main menu -> Console
webUI console displays events and enables option to control FFAN standard with ASCII text based commands.
Click here to see full list of commands with explanations.
outputs 1 enable false
This example command will disable second (0 is first) output port.
Main menu -> Configurations
List of configuration options and factory reset.
- Configure ethernet
- Configure MQTT
- Configure inputs
- Configure outputs
- Configure web server / webUI
- Configure misc
- Configure emergency mode
- Build backup – Clicking on “Build backup” button will create a backup file that will be opened in new browser tab! Please copy all and save as text file. Use this “ffan_backup_restore” tool to restore backup (download and unzip). Works with all modern web browsers. Another option for backup/restore is to use dedicated software which you can find here
- Factory reset
TIP! Did you knew, that factory reset can be initiated using button on front panel of the device. Do following: push and hold down UI button while pressing reset button. Wait for a while. A count down timer (set to 10 seconds) will appear on screen. Release UI button and press again to confirm.
Main menu -> Configurations -> Ethernet
Ethernet configuration options.
- optain IP address manually or automatically
- ethernet reconnect interval
- maximum reconnect attempts per session (will be zeroed out after full power cycle)
- automatically restart after maximum reconnect attempts has been exhausted

Main menu -> Configurations -> MQTT
MQTT connection parameters.
- server IP address
- server port
- client name (supports macros i.e. <MAC>). Device’s unique identifier, will be used to construct topic names
- server username
- server password
- root topic. Internally used as prefix while constructing topic names
- prodcast topic
- discovery topic
- status publish interval
- telemetry publish interval
- server reconnect interval
- ping interval
- parent MAC address
Example of LWT payload:
Topic:
   <root>/<mac>/LWT
Payload:
   Online or Offline
Example of discovery payload:
Topic:
   <root>/discovery
Payload:
   {"SerialNo":"61ebe67cc7cea","MAC":"DE07D6013C3A","Manufact":"Firefly OY","Model":"FFAN-standard-R2","FWver":"FFANOS-1 (1.9)","FWdate":"24.03.2023","FriendlyName":"FFAN","IPAddress":"172.16.1.120"}
Example of status payload:
Topic:
   <root>/<mac>/STATUS
Payload:
   {"status":"NORMAL","IPAddress":"172.16.1.120","UptimeSec":"2", "Uptime":"0000T00:00:02","MqttCount":"1"}
Example of telemetry payload:
Topic:
   <root>/<mac>/TELE
Payload:
   {"DS18B20":[{"id":"0","temp":"11.50"},{"id":"1","temp":"1.00"},{"id":"2","temp":"-127.00"},{"id":"3","temp":"-127.00"}],"AM2302":[{"temp":"10.30","hum":"48.30","heatindex":"8.65"}]}
Example of prodcast payload:
Topic:
   <root>/prodcast
Payload:
   DE07D6013C3A STATUS 1 NORMAL
Example of input events payload:
Topic:
   <root>/<mac>/INPUTS/EVENTS
Payload:
   {"port":"0","triggerType":"21","changeCount":"1","currentstate":"low"}
Main menu -> Configurations -> Inputs
List of available input ports. Each input port can be configured individually.
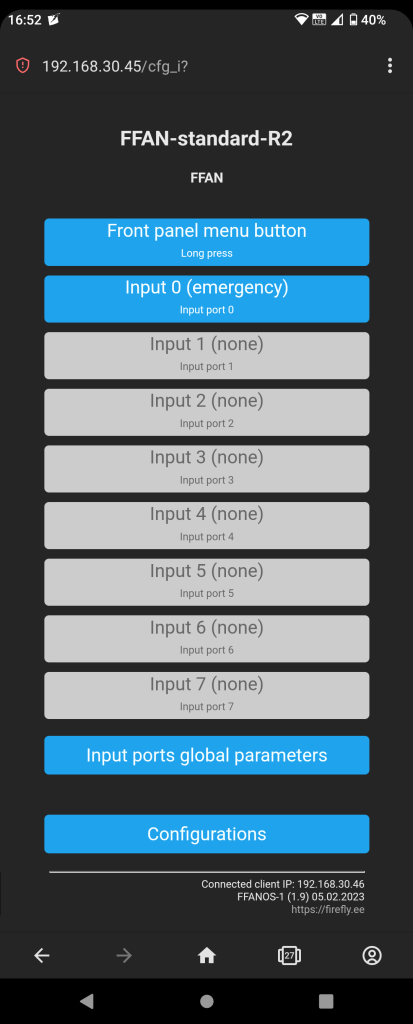
Main menu -> Configurations -> Inputs -> Properties
Input port properties.
- Port alias (port name to make things more human readable)
- Port availability: disabled or enabled
- Port type:
- None
- Button
- Button inverted
- Switch
- Emergency
Main Menu -> Configurations -> Inputs -> Trigger
Input port trigger. Trigger is what starts the processing of an action.
- List of triggers while input type is button or button inverted:
- None
- On press
- After one press
- On set amount of presses
- On set amount of presses or on timeout
- Must be pressed for set amount of time
- After timeout
- Delay after one press
- List of triggers while input type is switch:
- None
- On every state change
- On set amount of state changes
- On set amount of state changes or on timeout
- Must hold state for set amount of time
- Delay after one state change
- State change from low to high
- State change from high to low
- After timeout
- List of triggers while input type is emergency (works in conjunction with “Emergency mode activation” which can be configured via webUI “Main menu -> Configurations -> Emergency mode“):
- None
- On state low
- On state high
Main menu -> Configuration -> Inputs -> Action
Action that will happen after input port trigger condition is met. NB! Multiple actions are supported only when trigger type is “after timeout“.
- Action
- Do nothing
- Output toggle (local/remote output port or output group)
- Output on (local/remote output port or output group)
- Output off (local/remote output port or output group)
- Do MQTT (on connection fail, output toggle) (local output port or group)
- Do MQTT (on connection fail, output on) (local output port or group)
- Do MQTT (on connection fail, output off) (local output port or group)
- Output follow input (local output port)
- Output follow input inverted (local output port)
- Custom MQTT command
- Output
- Local
- Remote
- Output group
- Publish mqtt event: yes or no. If yes then event will be published to “<root>/<mac>/INPUTS/EVENTS” topic
Main Menu -> Configurations -> Inputs -> Global parameters
Input port global parameters.
- Input port count (how many physical ports device has)
- Timer duration one step resolution in milliseconds. Works in conjunction with input trigger timer duration step (can be changed via webUI “Main menu -> Configurations -> Inputs -> Input x ->Trigger“)
- Factory default value is 250ms (this gives us: 255_max_steps * 250ms = 63750ms = 63.75sec max timer duration and minimum timer duration 250ms).
- Minimum one step resolution is 10ms.
- Maximum is 1000ms.
- Some examples:
- TimerDurationOneStepResolution = 100ms gives us usable range 100ms (TriggerTimerDurationSteps = 1) to 25500ms (TriggerTimerDurationSteps = 255).
- TimerDurationOneStepResolution = 10ms gives us usable range 10ms (TriggerTimerDurationSteps = 1) to 2550ms (TriggerTimerDurationSteps = 255).
- TimerDurationOneStepResolution = 1000ms gives us usable range 1000ms (TriggerTimerDurationSteps = 1) to 255000ms (TriggerTimerDurationSteps = 255).
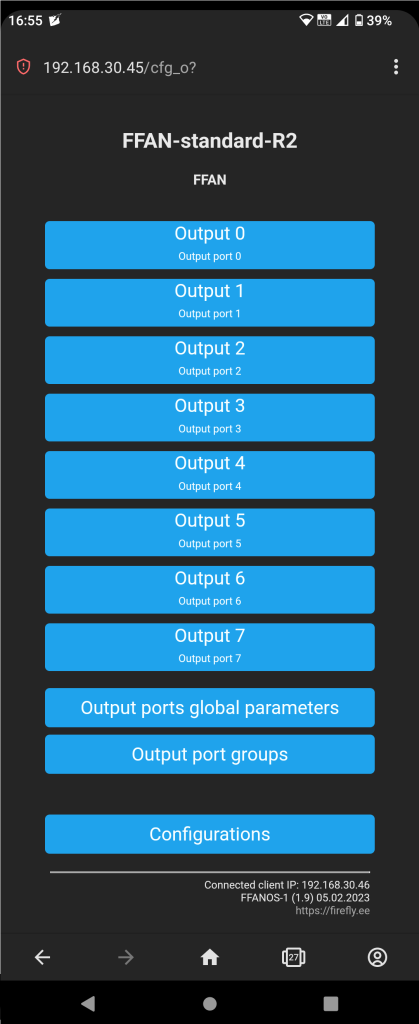
Main Menu -> Configurations -> Outputs
List of available outputs and output groups. Each output port can be configured individually.
Main menu -> Configurations -> Outputs -> Output
Output port parameters.
- Port alias (port name to make things more human readable)
- Port availability: disabled or enabled
- Restored state: off or on (this state will be used “Main Menu -> Configurations -> Outputs -> Output ports global parameters -> On bootup restore all ports states” is set to TRUE). Restore state is state that port takes after device power up
- Allow restore state overwriting: no or yes (if allowed then “Restored state” will be overwritted every time output port state changes)
- Is output port emergency sensitive: no or yes (if port is emergency sensitive and emergency condition is met then port will take state that is defined under “State during emergency active”)
- State during emergency active: off or on (option is visible only if “Emergency sensitive” is set to YES)
- External state change allowed: no or yes (if not allowed then output port state can not be changed via mqtt/webui/console/web requests. Only possible way to change state is by input port action)
Main Menu -> Configurations -> Outputs -> Global Parameters
Output port global parameters.
- Output port count (how many physical ports device has)
- On bootup restore all ports states: yes or no. If set to yes then on bootup each output state will be individually to state that is defined by “Main Menu -> Configurations -> Outputs -> Output x -> Restored state”
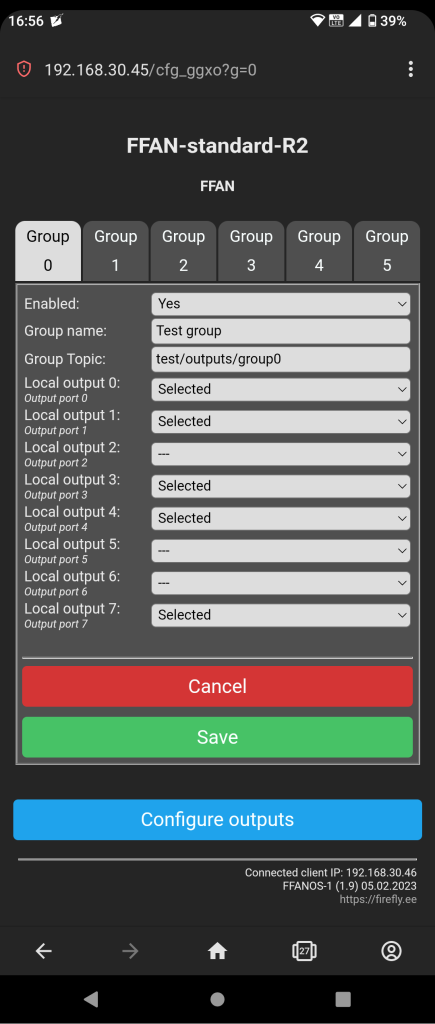
Main Menu -> Configurations -> Outputs -> Output groups
Currently FFAN Standard supports 6 different output groups.
- Enabled: no or yes
- Group name
- Group topic (macros can be used inside topics, i.e. )
- Outputs that belong to this particular group
Group support following commands:
   OFF, LOW, 0, FALSE
   ON, HIGH, 1, TRUE
   TOGGLE
Main menu -> Configurations -> Web server
Web server settings.
- Session lifetime in seconds. Specifies the maximum time to allow a session to remain valid. After this duration elapses, the user must reauthenticate. Used only if password is set.
- Password. webUI password. To disable login feature leave this field empty
- Public key.
- Outputs control page refresh rate in milliseconds
- Inputs state page refresh rate in milliseconds
- Telemetry page refresh rate in milliseconds
Main Menu -> Configurations -> Miscellaneous
Miscellaneous settings.
- Module friendly name
- Heartbeat indicator led: disabled or enabled
Main menu -> Configurations -> Emergency mode
Emergency mode settings. Emergency mode activation:
- Disabled
- On any emergency input active
- On all emergency inputs active
TIP! Emergency mode is special mode. One of the common use case: while on battery/emergency power (on mains supply lost) switch off outputs where power hungry devices are connected.
Output command descriptions
- state = set port state as on, off or toggle current state.
- fstate = force state, force port to take a state when normal state change is not allowed, i.e. if port is disabled.
- enable = enable or disable port. In other words set port availability.
Input command descriptions
- state = NB! This is read-only command and thus it only support parameter GET, because input port state can be changed, only by physical device (switch, button, sensor etc) state change.
- enable = enable or disable port.
- ptype = port type can be one of the following numbers:
- 0 = NONE (type not defined, no events will be fired)
- 1 = Button (normally open)
- 2 = Button inverted (normally closed)
- 3 = Switch
- 4 = Emergency
- sync = it is necessary to call sync after changing any of input port parameters. Command sync does not take any parameters.
Parameters
- Negative type:
- OFF
- LOW
- 0 (zero)
- DISABLE
- FALSE
- Positive types:
- ON
- HIGH
- 1 (one)
- ENABLE
- TRUE
- Toggle types:
- TOGGLE
- Get types:
- GET
Console commands
Console command structure is as follows:
io_type port command parameter
where IO type can be:
- inputs
- outputs
where port can be:
- 0..7
- all
output command can be:
- state
- fstate
- enable
input command can be:
- state
- enable
- ptype
- sync
and parameter can be:
- OFF, LOW, 0, DISABLE, FALSE
- ON, HIGH, 1, ENABLE, TRUE
- TOGGLE
- GET
MQTT commands
MQTT command structure is as follows:
port command parameter
where port can be:
- 0..7
- all
output command can be:
- state
- fstate
- enable
input command can be:
- state
- enable
- ptype
- sync
and parameter can be:
- OFF, LOW, 0, DISABLE, FALSE
- ON, HIGH, 1, ENABLE, TRUE
- TOGGLE
- GET
Some most common mqtt command examples:
- Turn on output port 0 (very first port):
- Command topic: <root>/<MAC>/OUTPUTS
- Command: 0 state on
- Result topics:
- <root>/<MAC>/OUTPUTS/OUTPUT
- <root>/<MAC>/OUTPUTS/OUTPUT0
- Get output port 3 state:
- Command topic: <root>/<MAC>/OUTPUTS
- Command: 3 state get
- Result topics:
- <root>/<MAC>/OUTPUTS/OUTPUT
- <root>/<MAC>/OUTPUTS/OUTPUT0
- Toggle all output port states:
- Command topic: <root>/<MAC>/OUTPUTS
- Command: all state toggle
- Result topics:
- <root>/<MAC>/OUTPUTS/OUTPUT
- <root>/<MAC>/OUTPUTS/OUTPUT0
- <root>/<MAC>/OUTPUTS/OUTPUT1
- <root>/<MAC>/OUTPUTS/OUTPUT2
- <root>/<MAC>/OUTPUTS/OUTPUT3
- <root>/<MAC>/OUTPUTS/OUTPUT4
- <root>/<MAC>/OUTPUTS/OUTPUT5
- <root>/<MAC>/OUTPUTS/OUTPUT6
- <root>/<MAC>/OUTPUTS/OUTPUT7
- Disable output port 7:
- Command topic: <root>/<MAC>/OUTPUTS
- Command: 7 enable false
- Result topics:
- <root>/<MAC>/OUTPUTS/ENABLE
- <root>/<MAC>/OUTPUTS/ENABLE7
- Enable input port 2:
- Command topic: <root>/<MAC>/INPUTS
- Command: 2 enable true
- Result topics:
- <root>/<MAC>/INPUTS/ENABLE
- <root>/<MAC>/INPUTS/ENABLE2
- Syncronise all outputs with inputs:
- Topic: <root>/<MAC>/INPUTS
- Command: all sync
- Get input port 5 state:
- Command topic: <root>/<MAC>/INPUTS
- Command: 5 state get
- Result topics:
- <root>/<MAC>/INPUTS/STATE
- <root>/<MAC>/INPUTS/STATE5
- Get input port 0 type:
- Command topic: <root>/<MAC>/INPUTS
- Command: 0 ptype get
- Result topics:
- <root>/<MAC>/INPUTS/PORTTYPE
- <root>/<MAC>/INPUTS/PORTTYPE0
MQTT system commands:
- Restart device:
- Command topic: <root>/<MAC>/SYSTEM
- Command: restart
- Request network info:
- Command topic: <root>/<MAC>/SYSTEM
- Command: network
- Result topic: <root>/<MAC>/NETWORK
- Request telemetry info:
- Command topic: <root>/<MAC>/SYSTEM
- Command: tele
- Result topic: <root>/<MAC>/NETWORK
- Request status info:
- Command topic: <root>/<MAC>/SYSTEM
- Command: status
- Result topic: <root>/<MAC>/STATUS
- Request auto discovery info:
- Command topic: <root>/<MAC>/SYSTEM
- Command: disco
- Result topic: <root>/<MAC>/discovery
Web request commands
Output port web request structure:
http://<ip>/webctrl/outputs?p=port&cmd=command&param=parameterInput port web request structure:
http://<ip>/webctrl/inputs?p=port&cmd=command&param=parameterwhere port can be:
- 0..7
- all
output command can be:
- state
- fstate
- enable
input command can be:
- state
- enable
- ptype
- sync
and parameter can be:
- OFF, LOW, 0, DISABLE, FALSE
- ON, HIGH, 1, ENABLE, TRUE
- TOGGLE
http://<ip>/webctrl/outputs?p=all&cmd=state¶m=toggle
Toggle all output ports
NB! Parameter GET not not supported. If you want to get output states then use http://<ip>/json/outputs and for input states use http://<ip>/json/inputs